You pull your carefully thrown pot from the kiln. It looks perfect at first glance. Then you see it: the bottom fused to the kiln shelf. Clay bits stick fast, and now you face hours of scraping or a ruined shelf. This heartbreak happens to potters everywhere because unclean pot bottoms trap loose particles, grog, and glaze drips. These bits melt during firing and bond everything together.
Loose clay dust or uneven feet cause most sticking. Heat turns silica in the clay into glass-like material that glues to shelves. You waste time, shelves, and pots as a result. Clean bottoms save all that hassle. They protect your work and extend kiln life. Best part? The process takes minutes with basic tools.
Anyone can master this step. Beginners avoid common pitfalls, while pros speed up production. Follow these simple methods, and your firings stay smooth. Let’s start by understanding why dirty bottoms cause trouble.
Why Unclean Pot Bottoms Ruin Your Firing Results
Loose clay particles scatter across pot feet during throwing or trimming. Grog grains add rough spots that don’t smooth out. Uneven feet from rushed centering trap more debris. Glaze drips hit contact points if you dip carelessly. All these lead to sticking.
In the kiln, temperatures climb past 1800 degrees Fahrenheit. Silica in clay softens and fuses. It bonds to shelf clay or kiln wash. You end up with pots that rock or shelves full of craters. Mid-fire clays like stoneware suffer most because they vitrify around cone 6.
Potters report this issue in online forums. One survey from a ceramics group found 40 percent of beginners lose shelves yearly to sticking. Pros lose less, but it still slows them down. Spot dirty bottoms by running your finger over the foot. Feel grit or bumps? Clean it now.
Prevention beats repair every time. Clean feet fire flat and true. Your pots stack better, and shelves last longer. Check bottoms under bright light. White dust signals clay residue. Brown specks mean grog. Fix these early, and you fire with confidence.
High dust in your studio worsens it. Dry clay throws particles everywhere. Wipe tools between pots to cut buildup. Test fire a scrap piece if unsure. See sticking? Adjust your routine.
Tools You Need for a Sparkling Clean Pot Bottom
Gather a few basics before you start. A soft sponge removes loose clay fast. Clean water keeps it simple. A rubber or metal rib scrapes stubborn spots. Fine sandpaper smooths everything. A wire brush tackles tough grog. Dry with a towel. Optional kiln wash preps shelves later.
Household items work fine, so you save money. Buy sponges at dollar stores. Ribs cost under $5 at pottery suppliers. Sandpaper from hardware aisles runs cheap. Wear a dust mask because clay dust irritates lungs. Gloves protect hands from rough edges.
Keep tools clean to avoid cross-contamination. Rinse after each use. Store dry to prevent mold.
Choosing the Right Sponge and Rib for Gentle Cleaning
Pick a natural sea sponge for best absorbency. It holds water without dripping. Synthetic ones scratch less on soft clay, so test both. Soft versions prevent gouges that trap more dirt later.
Rubber ribs flex for control. They hug curves without digging in. Metal ribs cut faster on leather-hard clay, but angle them carefully. Pros sharpen ribs weekly with fine steel wool. Clean them in soapy water after sessions.

Sandpaper and Brushes That Get Into Every Crevice
Use 220-grit sandpaper for most clays. Finer 400-grit polishes stoneware feet. Coarser 150-grit suits porcelain if leather-hard. Wrap around a block for even pressure.
Wire brushes shine on grog clumps. Choose soft brass bristles to avoid scratches. Work leather-hard clay only; bisque crumbles. Light strokes prevent over-removal. Test on scraps first.
Your Foolproof Guide to Cleaning Every Pot Bottom
Clean at the leather-hard stage. Clay holds shape but softens under water. Work in bright light. Rotate the pot slowly. Aim for smooth, dust-free feet that feel slick to touch. This prevents 95 percent of sticking issues.
Follow steps in order. Each builds on the last. Your pots fire clean every time.
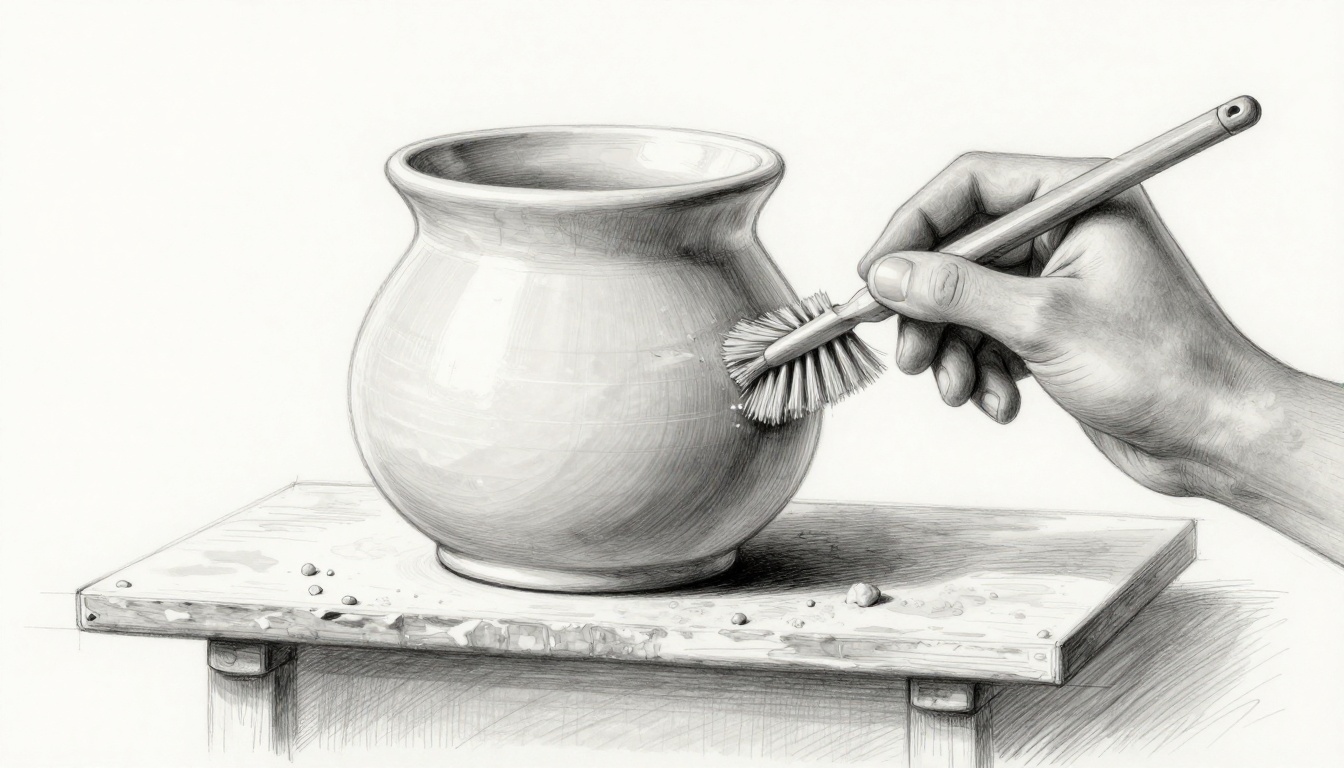
Wipe Away Loose Clay with a Damp Sponge
Soak a soft sponge in clean water. Squeeze out excess. Gently wipe the foot while turning the pot. Use circular motions. This removes 80 percent of loose clay fast.
Rinse the sponge often. Change water if cloudy. Wipe upward to avoid pushing debris into crevices. Dry check: no white residue means success.
Scrape Stubborn Grog and Bumps Smooth
Take your rib. Hold at a 45-degree angle. Apply light pressure. Scrape from center outward. Feel the surface improve.
Rotate and repeat. Check by touch every pass. Smooth bumps flatten fast. Stop when even. Rinse rib between pots.

Sand for a Glassy Finish That Kilns Love
Grab 220-grit sandpaper. Use light circular motions. Focus on high spots. Wipe dust with a damp sponge after 30 seconds.
Switch to finer grit if needed. Dry fully before stacking. Test on a scrap pot first. Slick feet resist firing fusion.
For more on sanding techniques, check this pottery cleaning guide from Ceramic Arts Network.
Final Dry and Inspect for Perfection
Towel off excess water. Air dry 10 minutes. Run your finger over the bottom. It should glide smooth, no catches.
Inspect edges too. Prep shelves with kiln wash now. Stack pots loosely. Witness cones confirm even heat.
Bonus Ways to Bulletproof Your Firing Against Sticking
Cleaning alone works wonders. Add these for total protection. Kiln wash coats shelves. Posts create space. Slower ramps cut thermal shock.
High-dust studios need extra wipes. Skip cleaning on perfect press-mold bottoms. Still worried? Test one rack first.
Learn shelf prep details from BigCeramicStore’s kiln furniture tips.
Coat Shelves with Kiln Wash for Extra Insurance
Mix kaolin, gerstley borate, and water. Ratio: 70 percent kaolin, 30 percent borate, thin with water. Brush three coats.
Fire to cone 04 to harden. Reapply after 10 firings. It releases stuck glaze easy.

Smart Stacking Tricks That Save Space and Sanity
Use 1/2-inch posts every four inches. Place batts between layers. Cones at front track heatwork.
Space glazed feet 1/4 inch apart. Fire slower first ramp. This cuts sticking by half.
Clean pots make stacking simple. You fit more with less waste.
See stacking best practices at The Potter’s Studio kiln loading advice.
You now know how to clean pot bottoms before firing. Start at leather-hard with sponge, rib, and sandpaper. Add kiln wash and smart stacking for wins. Your shelves stay pristine, pots release easy.
Try this on your next batch. Share photos in comments. What sticking story do you have? Subscribe for more tips. Pin this for later. Master these basics, and your pottery shines pro-level.